Why we are writing this blog?
The intent of writing the blog is to help & provide some guidance to people who are working on the same tech stack or the same kind of project. We have encountered multiple problems while setting up the stack. If anyone is having the same issue, The document can help you to move a step ahead & this will serve our intention of capturing it.
We are still working on the same setup & if we face any anomalies in the future in the setup, we will try to update the doc with new changes.
Prerequisites
Before jumping on the setup part, let’s first take a brief about all the technologies we are using in the project. Below is the list of all technologies:-
– Kubernetes
– Spark
– Airflow
Kubernetes
Kubernetes is a container management system developed on the Google platform. Kubernetes helps to manage containerized applications in various types of physical, virtual, and cloud environments. Google Kubernetes is a highly flexible container tool to consistently delivers complex applications running on clusters of hundreds to thousands of individual servers.
Spark
Apache Spark is an open-source, distributed processing system used for big data workloads. It utilizes in-memory caching and optimized query execution for fast queries against data of any size. Spark is a fast and general engine for large-scale data processing.
Airflow
Apache Airflow is an open-source platform for developing, scheduling, and monitoring batch-oriented workflows. Airflow’s extensible Python framework enables you to build workflows connecting with virtually any technology. A web interface helps manage the state of your workflows. Airflow is deployable in many ways, varying from a single process on your laptop to a distributed setup to support even the biggest workflows.
Below is the diagram which demonstrates the flow of the current setup:

The listed steps need to be followed to achieve end goal i.e running spark application on k8s through airflow schedule:
Step 1 – Kubernetes Cluster.
Step 2 – Spark Operator setup over Kubernetes.
Step 3 – Installation of Airflow over Kubernetes.
Kubernetes Cluster
We have done the setup using RKE2. The RKE document very nicely captured all steps to set up the cluster & we have also created our cluster referring to the official RKE2 document. Hence we are skipping the installation process.
Spark Operator setup on Kubernetes
After starting your k8s cluster you’re ready to install spark-operator inside the k8s.
Below are the commands to do the same:
$  kubectl create namespace spark-operator
$  kubectl create namespace spark-jobs
$  helm repo add spark-operator https://googlecloudplatform.github.io/spark-on-k8s-operator
$  helm install <name of spark operator> spark-operator/spark-operator --namespace spark-operator --set webhook.enable=true
We have set Kubernetes to run spark applications in the custom namespace by adding: –set sparkJobNamespace=spark-jobs
$ helm install spark-operator spark-operator/spark-operator --namespace spark-operator --set webhook.enable=true --set sparkJobNamespace=spark-jobsNow we need to create a service account called spark and a clusterrolebinding.
$  kubectl create serviceaccount spark -n spark-jobs
$  kubectl create clusterrolebinding spark-role --clusterrole=edit --serviceaccount=spark-jobs:spark
Spark-operator setup is completed & let’s test the spark operator by submitting a sample spark application using the deployment file. Below is the content of the file (sample.yaml): –
apiVersion: "sparkoperator.k8s.io/v1beta2"
kind: SparkApplication
metadata:
 name: spark-pi
 namespace: spark-jobs
spec:
 type: Scala
 mode: cluster
 image: "gcr.io/spark-operator/spark:v2.4.4"
 imagePullPolicy: Always
 mainClass: org.apache.spark.examples.SparkPi
 mainApplicationFile: "local:///opt/spark/examples/jars/spark-examples_2.11-2.4.4.jar"
 sparkVersion: "2.4.4"
 restartPolicy:
   type: Never
 volumes:
   - name: "test-volume"
     hostPath:
       path: "/tmp"
       type: Directory
 driver:
   cores: 1
   coreLimit: "1200m"
   memory: "512m"
   labels:
     version: 2.4.4
   serviceAccount: spark
   volumeMounts:
     - name: "test-volume"
       mountPath: "/tmp"
 executor:
   cores: 1
   instances: 1
   memory: "512m"
   labels:
     version: 2.4.4
   volumeMounts:
     - name: "test-volume"
       mountPath: "/tmp"
Commands to deploy/start the application –
$ kubectl apply -f sample.yamlYou can list all sparkapplication jobs by the below command –
$ kubectl get sparkapplication -n spark-jobs
To check the spark application log, use below command –
$ kubectl -n <namespace> logs -f <driver pod name>Now we are done with spark, now we will start the installation of Airflow on Kubernetes.
Installation of Airflow On Kubernetes
Create namespace in Kubernetes cluster using the below command –
$ kubectl create namespace airflowHere we are using helm for Installation of Airflow.
$  git clone -b main  https://github.com/airflow-helm/charts.git
$  helm upgrade --install airflow charts/airflow -f values.yaml -n airflow
$  helm upgrade --install airflow  /path/airflow/charts/charts/airflow -f values.yaml --namespace airflow
Changes which we have done in values.yaml are following –
- Changed executor type from CeleryExecutor to KubernetesExecutor

- Kept Flower component disabled.
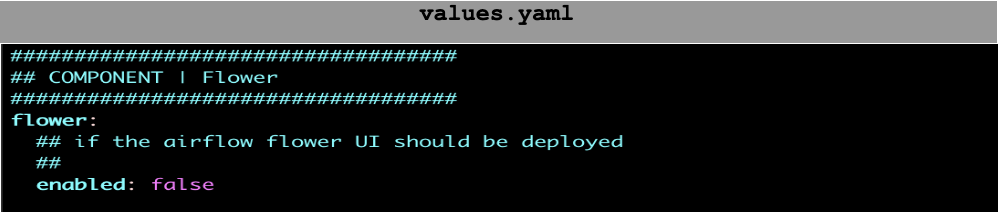
- Disabled redis.

- Added git repo URL where airflow will check the dag files –

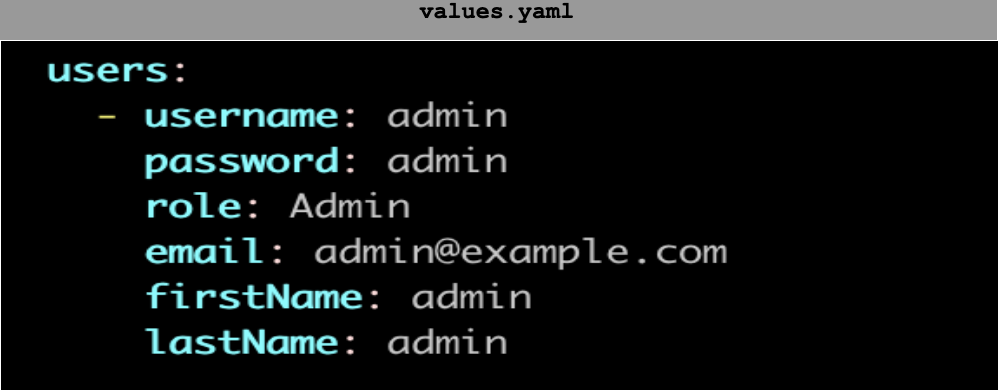
- Configure web ui user account – (You can set your own.)
Once installation is done we can see the pods and services of airflow.
$ kubectl get pods -n airflow
$ kubectl get svc -n airflow
We can connect airflow by UI using airflow-web service with user account details which are configured in values.yaml file.
You have to create a kubernetes_conn_id from airflow web UI.
Select Admin then select the connection and then create one conn id.

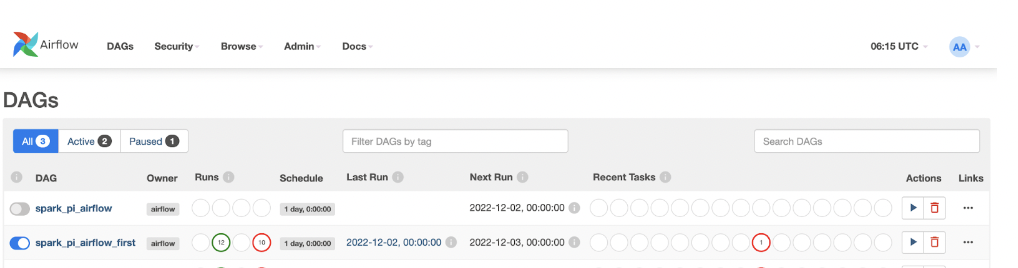
Sample Dag which we used for testing –
from airflow import DAG
from datetime import timedelta, datetime
from airflow.providers.cncf.kubernetes.operators.spark_kubernetes import SparkKubernetesOperator
from airflow.providers.cncf.kubernetes.sensors.spark_kubernetes import SparkKubernetesSensor
from airflow.models import Variable
from kubernetes.client import models as k8s
from airflow.contrib.operators.kubernetes_pod_operator import KubernetesPodOperator


default_args={
   'depends_on_past': False,
   'email': ['abcd@gmail.com'],
   'email_on_failure': False,
   'email_on_retry': False,
   'retries': 1,
   'retry_delay': timedelta(minutes=5)
}
with DAG(
   'my-second-dag',
   default_args=default_args,
   description='simple dag',
   schedule_interval=timedelta(days=1),
   start_date=datetime(2022, 11, 17),
   catchup=False,
   tags=['example']
) as dag:
   t1 = SparkKubernetesOperator(
       task_id='n-spark-pi',
       trigger_rule="all_success",
       depends_on_past=False,
       retries=3,
       application_file="spark-pi.yaml",
       namespace="spark-jobs",
       kubernetes_conn_id="myk8s",
       api_group="sparkoperator.k8s.io",
       api_version="v1beta2",
       do_xcom_push=True,
       dag=dag
   )
spark-pi.yaml file –
apiVersion: "sparkoperator.k8s.io/v1beta2"
kind: SparkApplication
metadata:
 name: spark-pi
 namespace: spark-jobs
spec:
 type: Scala
 mode: cluster
 image: "gcr.io/spark-operator/spark:v2.4.4"
 imagePullPolicy: Always
 mainClass: org.apache.spark.examples.SparkPi
 mainApplicationFile: "local:///opt/spark/examples/jars/spark-examples_2.11-2.4.4.jar"
 sparkVersion: "2.4.4"
 restartPolicy:
   type: Never
 volumes:
   - name: "test-volume"
     hostPath:
       path: "/tmp"
       type: Directory
 driver:
   cores: 1
   coreLimit: "1200m"
   memory: "512m"
   labels:
     version: 2.4.4
   serviceAccount: spark
   volumeMounts:
     - name: "test-volume"
       mountPath: "/tmp"
 executor:
   cores: 1
   instances: 1
   memory: "512m"
   labels:
     version: 2.4.4
   volumeMounts:
     - name: "test-volume"
       mountPath: "/tmp"
You have to push your Dag and spark application file in the configured repo then airflow automatically picks the job and will start processing.
The same you can vary from seeing the spark driver pod log using the command shared previously.
At this stage, we are good to start the development work & can also run the spark application. Everything will run fine but we will suggest to add PVC for PostGres to retain the Airflow all data. Also if possible or as per the need you can add PVC to all required pods including the spark application.
Below we are also sharing the step to add PVC for PostGres:-
- For adding the PVC we have to set enabled to true under the persistence section.
- Add storageClass. (In our case we are using rook-cephfs)
- Add the size according to requirement.

Conclusion
In this blog you learned how can you run sparkapplication in Kubernetes with Airflow and how you can start using it.